How to Import OLM into Office 365
Microsoft Outlook is an advanced email client that organizations use for managing emails, contacts, calendars, etc. It can be used as a standalone application as Windows Outlook or Mac Outlook. It can also be used as a cloud-based service through an Office 365 or Microsoft 365 subscription.
If you are migrating from Mac Outlook to Office 365, then transferring your mailbox data from the former to the latter can be challenging. That’s why there are many third-party applications in the market that you can use to import Mac Outlook’s OLM files into Office 365 directly.
Why Import OLM into Office 365?
Outlook users generally import Outlook OLM file into Office 365 account to avail the benefits of cloud technology that O365 offers.Many organizations migrate to Office 365 because of perks, such as storage scalability, advanced collaboration features for the teams, etc. If these organizations are using Outlook for Mac, they need a solution to import OLM to Office 365.
How to Import OLM into Outlook 365?
The best way to import Outlook OLM data to Office 365 is to use a third-party utility designed for this purpose. Stellar Converter for OLM Technician is one such tool that you can use to transfer your OLM files to an Office 365 account directly.
The following are some of the main features of Stellar Converter for OLM Technician:
- Converts OLM to Office 365 directly and easily
- Converts OLM to PST, PDF, HTML, RTF, MSG, and EML formats
- Automatically finds OLM files on your system
- Offers detailed preview of OLM mailbox before saving the data
- Supports all Outlook versions- Outlook 2019, 2016, 2013, 2010, 2007, and 2003
How to Use Stellar Converter for OLM?
To use the application, follow the steps below.
Note: Make sure that you purchase the Technician edition of Stellar Converter for OLM. The standard version of the program doesn’t allow direct conversion of OLM to Office 365.
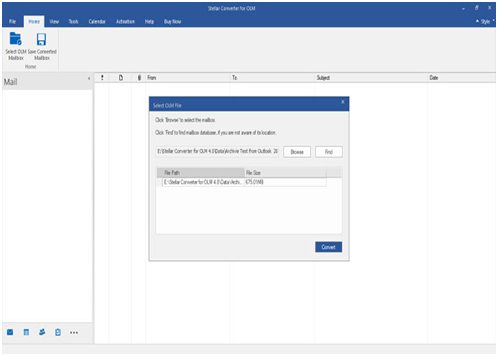
1. Launch the software. In the Select OLM File window that opens, click the Browse button and provide the path of the OLM file. If you don’t know the file’s location, you can also click the Find button to have the tool locate the file for you automatically.
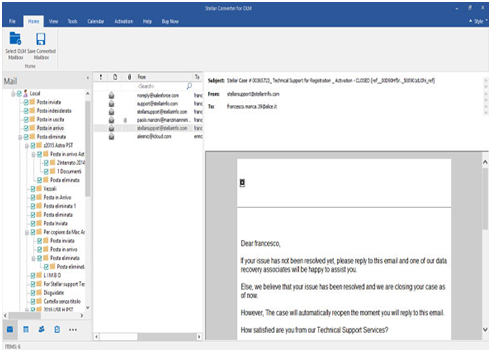
2. After providing the OLM file’s path, click the Convert button to begin file conversion. The program will show the conversion progress in a new window, and once it’s done, it will display the OLM mailbox in a preview window.
3. Review the contents of the OLM file. You can expand the folders in the left pane, select individual items in the middle pane, and inspect the selected emails in the right pane.
4. Select the folders you want to import to Office 365 in the left pane and click the Save Converted Mailbox button under the Home tab.
5. In the Save As window that opens, select the option Office 365.
6. Enter your Office 365 credentials and wait for the application to transfer your OLM data to an Office 365 account.
If you follow the above steps, your OLM data will be imported to Office 365 safely.
How to Import OLM to Office 365 Without Third-Party Software?
If you don’t want to purchase a third-party OLM to PST Converter application to convert OLM to Office 365, you can apply a manual method. In this method, you need to follow these steps:
- Create a dummy Gmail account and set up the account in Outlook for Mac.
- Import the OLM file in Outlook for Mac and then move the emails to the Gmail account.
- Open Outlook on a Windows system and set up the same Gmail account.
- Once all the emails are downloaded to the Gmail account in Windows Outlook from Google Server, export the emails to a PST file.
- Export the PST to Office 365 by applying the network upload process.
Compared to the third-party software method, this method requires a lot of time, attention to detail, and technical aptitude. So, bear all this in mind before proceeding.
Conclusion
Microsoft Outlook is a desktop-based application, while Office 365 is a cloud-based platform. That’s why migrating mailbox data from former to latter isn’t easy. You can use an advanced third-party application to transfer the data directly and safely. Otherwise, you can transfer the data manually if you have a strong technical background and are comfortable putting in the method’s time and effort.